Best Way to Manage Google Photos
Google Photos offers a Memories feature that automatically curates a selection of past moments based on its algorithms. While this can be a convenient way to revisit cherished memories, sometimes the content may not align with one’s preferences. For instance, the Memories section may display photos with certain people or during specific periods that a user may not wish to see.
Also Read: How to change username associated with your email address?
However, it is possible to personalise the Memories feature by selecting which memories to display and which to hide. This feature allows users to tailor their experience to better suit their preferences and relive their favourite moments. The Memories feature has been available since September 2019 and continues to provide a fun and convenient way to revisit past memories.
How To Easily Manage Google Photos Memories & AI Creation:
1. Select the Memories to Receive
Open Google Photos, tap on your profile picture, go to the app’s Settings, and enter the Memories section.
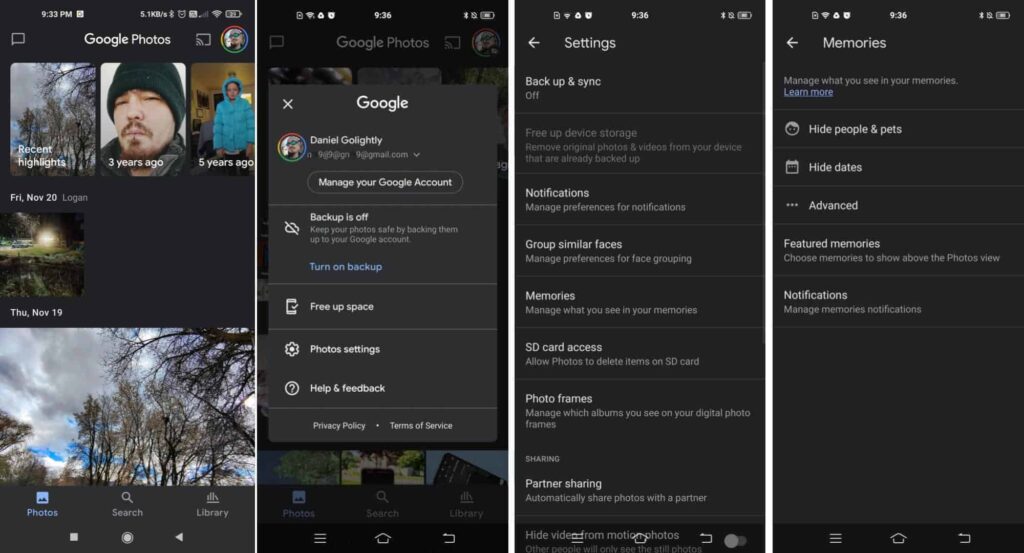
To personalize your Google Photos Memories, simply access the Selection of Memories menu, where you can enable or disable various options. This includes the ability to show or hide photos and videos taken during the same week in previous years, recent photos and videos displayed in the Selection of the Moment, and themed memories that contain photos and videos related to specific people, places, or themes. By selecting the Memories that matter to you, you can enhance your experience and enjoy reliving your favorite moments with greater precision and clarity.


2. Hide People from your Memories
While browsing through your daily Memories on Google Photos, you may come across photos of individuals you would rather not see. In such cases, the app offers a solution: the ability to hide a person from your Memories. This can be easily accomplished by tapping on your profile picture and accessing the app’s Settings. From there, you can select the option to hide a person, effectively filtering out their presence from your Memories. This feature allows for a more personalized experience, ensuring that your favorite memories are not clouded by unwanted content.

To hide specific people or animals from your Google Photos Memories, navigate to the appropriate section in the app and select the option to Hide People and Animals. From there, you can simply select the faces of individuals or animals you prefer not to see in your Memories.
However, it is important to note that in order to use this feature, you must first activate the app’s facial recognition function. Once this feature is enabled, you can easily curate your Memories to better suit your preferences and relive your favorite moments with ease.
3. Hide a Date or a Period
Likewise, Google photos let you hide certain dates or periods that you do not want to be reminded of. To do this, go back to Google Photos Settings, enter the Memories menu, and go to the Hide dates section.
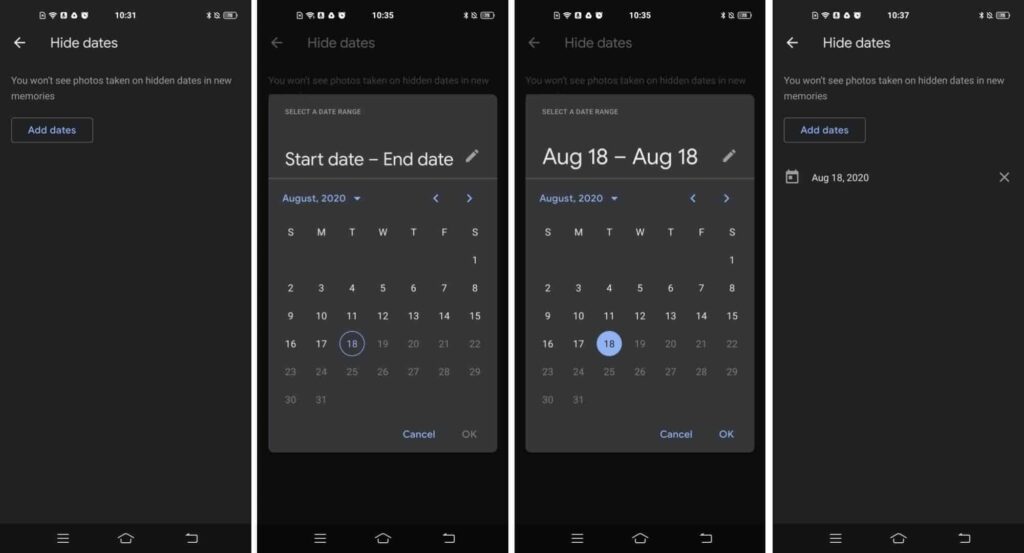
Then tap Add dates, and set the time period for which you don’t want Google Photos to generate memories. Then validate the period by pressing the OK button.
4. Choose the Creations to Incorporate Into the Memories
In some memories generated by Google photos, the application can in some cases automatically create Animations, Montages, Moving Photos, etc.
If you don’t want to see these creations added to your memories, go to Google Photos Settings, then in the Memories menu, go to Advanced Settings. You can then select the automatic creations that should not appear in your memories.
5. Customize Notifications
For each memory generated by Google photos, the application will send you notifications. You can deactivate these notifications by going to the Google Photos Settings, then in Memories, by accessing the dedicated Notifications menu.
Among the notifications linked to memories, you can deactivate those concerning previous Years, thematic memories, or even Creations.

Since this section is unique for all Google Photos notifications, you can take the opportunity to turn off those you don’t think are necessary such as Sharing Suggestions, Impression Promotions, Photo Book Suggestions, and much more.
Follow Us On:-