


Simple Tricks to Organize Gmail | How to Sort Inbox In Gmail?
We use Gmail every day to send and receive emails and it is a fundamental tool in our lives but its use is much easier if we can easily organize Gmail with a series of tools, tricks, options, and settings that will allow us to keep the inbox orderly, delete emails automatically or control and review the senders or new emails that reach us.
Organize your inbox
You can choose to add labels, you can move to folders by theme or by type of email received or we can sort or delete messages that are of no use to us and that bother us, for example. There are all kinds of default options in Gmail and others that we can get thanks to extensions for the browser.
Tags
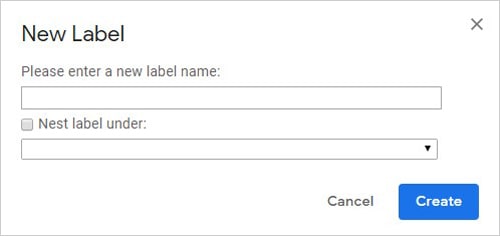
We can add labels and icons to the different messages and it is one of the best ways to manage the Gmail inbox and have it completely organized. Just touch on any message you have and select it with the check on the left side of it. At the top, go to the tool and icon bar and choose the labels that you will see similar to the previous screenshot. Here we will have the option of using one of the available labels that are created by default or we can choose the option “Create a label” to make a new one. We can add the name we want to the label, choose different colors and even nest one inside the other in case you want to create categories and subcategories that are related but differentiated at the same time.
Once you have them created, you can go to the left side of the inbox where you will see all the colors and labels and you can choose the one you want to see all the emails that are in them.
We can also use extensions that help us to automatically label any Gmail email that we receive by default. Gmelius is a tool that automatically allows received messages to be automatically assigned to a label that we have previously configured. It is a tool that helps with management but that you really won’t need if you want to add tags. It will help you to have a better organization, but it is not essential. You can add it as an extension to Google Chrome and Gmelius also has other extra tools to manage Slack, LinkedIn, or Gmail.
Create folders
Similar to the labels are the folders that will allow us to move the mail from the inbox to any other tray. Creating them works the same as in the case of labels but with the icon that you will find right next to the previous option. Select the emails you want and at the top of Gmail choose “Move to …” Here you will have to choose a folder from all those created. The email disappears from the general inbox and will go to one of those that you have previously created.
Add icons
Beyond the above, we can add a small icon of the store or website that the email sends us if we want to easily identify each email. We can do it through an extension as this is not available by default in the email service. The extension is called Gmail Sender Icons and it’s free from the Chrome extension store.
Once we have installed Gmail Sender Icons in our Chrome browser, when we go to the Gmail tray we will see how next to each received message an icon and the name of the domain or platform used to send the message appear next to the sender’s name. That is, if we receive a new email from a site to which we are subscribed, the icon of that site will appear, specifically the favicon used by that website, along with the domain name. For example, if we receive a message from Dropbox stating that we are about to run out of space in our account, we will see an icon with the Dropbox logo along with the address dropbox.com in the Gmail inbox.

In this way, when we are looking for a message in our Gmail tray, it will be much easier to identify the senders of the same by simply seeing the icons and names of the sites next to each message. If at any time we want to hide this information, just click on the Gmail Sender Icons icon that appears next to the Chrome address bar and slide the icon or domain name switch to the OFF position. This will hide the icons or names of the senders’ websites in our Gmail inbox.
View and order conversations
You can view and order conversations in Gmail as you like or more comfortable: we can search conversations even if we do not know the sender, see all emails from the same person or delete emails that have been received between two specific dates.
See all emails from the same sender
It is very common to want to have other email messages from the same sender at hand when receiving a new message from that contact. Thus, we can consult previous messages for more information or have them on hand to refer to any detail of them.
We can do it from the Gmail inbox where you have all the messages received or sent. Hover over the sender’s name and choose the “More information” option. A box will appear on the right side of the screen where you will see the contact details and the “recent interactions”. Here you can see all the emails sent and received by that person and you can tap on each of them to read them whenever you want.
Find messages from a sender we don’t know
When we want to search for a certain message but we don’t know the sender’s name, things get complicated. However, Gmail offers us this possibility by taking advantage of the Google search bar that is displayed at the top of our mail. You just have to write here any word of the email you want to search for it in the list of messages received or in all trays. It can be a word or words from the email or the name of the attached files.
Delete Gmail messages between two dates
or first of all, it will be to open a window of our favorite browser and enter our Gmail account. Once there, we must look at the search box that the Google email service offers us and that is displayed at the top of the page. We usually use this box to search for messages from a specific person or that contain certain words, however, it can be used much more, for example, to filter messages between two specific dates.
In this way, we can delete Gmail messages between those two dates quickly and easily. To do this, we will have to use the after: and before commands. Two commands that the Gmail search engine offers us and that we can see how it recognizes them by simply starting to type them.
These commands can be used separately or together, that is, they allow us to filter our emails to retrieve those messages before or after a date or those that are between two specific dates.
If we execute the command after: yyyy / mm / dd , Gmail will show us all the messages after that date, while if we launch the command before: yyyy / mm / dd , we will get the messages before the date we indicate. But if we want to limit to delete Gmail messages between two specific dates, then we will have to use both commands in this way, after: yyyy / mm / dd before: yyyy / mm / dd . This way we will have all the Gmail messages between one date and another.
Once this is done, we just have to select the Select all option and click on the Delete option.
Sort conversations backward
Although you don’t have a large number of options for sorting conversations in Gmail, there are extensions you can use to extend them. You can sort the conversations in an email by making them just the other way around: the most recent will appear first.
The extension in question is called Gmail reverse conversation, and as its name suggests, it has been developed precisely for that, to order the conversations or responses to our email messages in reverse order. That is, at the beginning, we will see the last answer in the thread of our answers instead of seeing the oldest first and having to go all the way to the bottom to see the last answer.
The first thing we have to do in order to have the responses to our email messages in Gmail in order in this way is to install the extension in our browser. Once this is done if we had Gmail open we must close it and reopen it so that Gmail reverse conversation can organize our responses as we want. At that time, we will be able to go to the thread of any email message that we have with several responses and check how the first one that appears is the last one received. In this way, we can quickly respond to Gmail messages without having to scroll down in a conversation to find the last answer.
Mark all as read
Surely on more than one occasion, you have met with dozens of unread email messages in your Gmail tray and you have arranged to mark all of them as read. To do this, the usual thing is to order our tray in such a way that the unread ones are shown first and mark all the messages on each page to later mark them from the menu options as read.
If there are few messages that we have as unread, it may not require much effort, but if we accumulate a large number of unread messages, it can become quite tedious. However, Gmail offers several ways to mark all unread messages as read in one fell swoop.
The first one is perhaps the fastest and most direct. From the main or received tray, click on the option to mark all messages, and then we will see how a notice appears just above the list of messages where we are warned that X messages on the first page have been marked and it offers us a link to select the rest of the main tray messages found on the rest of the pages. If we do not click on this link, only the messages on the first page will be marked and therefore we will not be able to mark as read anything other than the unread messages on that page.
Once we have marked all the messages in our Main tray, now we can go to the More menu options and select Mark as read.
We can also do something similar through the search engine that is shown at the top of Gmail. We write is: unread and press Enter. Automatically we will be shown all the messages that we have as unread and that we must mark to later mark them as read.
Delete everything from your Gmail account
If you want to finish with everything you have and save space and have a “space” for new emails, we can do it quickly, although you should think about it since there may be relevant information. We simply have to go to our Gmail tray and touch the box at the top of the screen, as indicated in the image below.
Once you have it, go to the top bar of the page and tap the trash can icon. All your emails will go to the trash. You must repeat the process with other trays that you have as “spam” or as “drafts. You will have everything in the mail bin …
When everything is in the trash, go to the left side of the menu, choose “Trash” and tap on “Empty the trash now”. Everything in it will be removed. Keep in mind that if you don’t do it manually, you will only have to wait a month: messages that have been in the trash for more than 30 days are automatically deleted.
Manage received messages
Not all emails that reach us are necessary or expected. That is why Gmail allows us to manage received messages and senders. We can silence certain senders, block them, mark them as spam or decide that they are a priority and that we want them to always be displayed at the top.
Silence
To silence email messages in Gmail that are not of our interest or we prefer not to be notified of them, the first thing we have to do is open our Gmail email and then select the message or chain of messages that we want to silence. Once we have the email message selected, we go to the menu options that are activated at the top and within the More option, we select Mute.
This function is also available in the Gmail mobile application, so it can also be interesting to silence certain messages so that they do not bother us when they enter the mail and we are using the mobile. To silence Gmail email messages that are not to our liking or that are bothering us, we open the app on the mobile and look for the message or messages that we want to silence. Once we have found it, we select the message and click on the button with the three dots to access the menu options and be able to select the Mute option.
In both cases, Google will automatically archive all incoming messages that have to do with the one we have marked, for example, all those within the same email thread. This implies that they will not be shown in our inbox and that we will not receive notifications of new messages. At any time, we can undo this option by performing the same process and selecting the option Stop mute.
Block a sender
We can mark it as spam or block a sender if we do not want your emails to reach us anymore. We will block that email address exclusively so keep in mind that if you have several different ones, it will not affect the blocking and you will have to do them one by one. To do this, go to the email in question and tap on the three points in the upper right. Here choose the option “block …” You will not receive more emails from that person or company.
If you want to see what you have blocked, you can go to the security review of the Google account or the mail settings. Tap on the gear icon in the top right and open the settings. Once here, choose the “filters and blocked addresses” tab. You will see all the email addresses that have been blocked and whose messages will go to spam.
To unblock a sender simply tap on “unblock on the right side” or select several of them and go to the bottom of the page to choose “unblock selected addresses”.
Snooze email messages
Postponing a message allows us not to see it read to see it at another time or, to receive it later and be able to respond correctly without forgetting it. And we can do it from the Gmail tray without installing anything specific.
To postpone an email in Gmail from the web version of Google’s mail service, the first thing we have to do is enter Gmail with our account and have the new Gmail interface activated. Next, in the mail inbox, we look for the message we want to postpone and when we hover the mouse over that message, a series of icons will appear on the right-hand side.
Among these icons, we will find on the right side one represented by a clock, which is precisely the one we are looking for since it is the one that allows us to postpone email messages to receive them at another time. By clicking on it, a menu will appear with different options, Today later, Tomorrow, This weekend, Next week, Someday, or Choose date and time. We choose the one we want and it will automatically be saved to us among the postponed Gmail messages.
If we want to postpone email messages from the mobile, first of all, we must check that we have the updated Gmail app on the mobile to make sure that we are going to find this function. Once this is done, we can open Gmail on the mobile and go to the email message that we want to postpone. To do this, we scroll through the inbox and touch the email that we want to receive at another time. Once we have touched on the message, the next thing we have to do is click on the menu button that appears in the upper right with the three dots and select the Postpone option. This will show us a window in which several options appear and are represented by different icons, Today later, Tomorrow, This weekend, Next week, Someday, or Choose date and time.
Choose priority senders and messages
Gmail allows us to always have what is most important visible. The interface has a configuration option that allows us that emails that we have not yet answered or those that you want to track appears at the beginning of your inbox in Gmail.
We have to follow a few steps:
- Let’s go to our Gmail account
- We tap on the gear icon in the right corner
- We open the option “See all settings”
- We go to the “General” section
- We scroll to the end
- We look for “Automatic reminders”
Here we will see two options that we can mark:
- Suggest emails to reply to Emails that you may have forgotten to reply to will appear at the top of your inbox
- Suggest emails to follow up: Sent emails that you may want to follow up on will appear at the top of your inbox
You can check the options to activate these automatic reminders so that important emails always appear at the top.
Cancel subscriptions
Although we can silence or mark it as spam, we can also unsubscribe from advertising bulletins or newsletters directly from Gmail. You will generally see this option at the bottom of the newsletter where it tells you something like “click here to stop receiving emails” or “stop receiving this email” and similar anchors. You follow the steps and deactivate it. But Google also allows us the option to cancel it.
In an email or email that we have received, when we open it, right next to the email address a link will appear with the text ” unsubscribe “. In this way, in the case of a « newsletter » or advertising bulletin, we will ensure that no more information ever reaches us.
Another option if you don’t see this anchor is to tap on the three dots in the upper right corner and choose “unsubscribe” or “unsubscribe”.
Reply and forward
Beyond receiving emails, Gmail also helps us respond or send to us and that is why there are other useful tricks to organize emails such as creating automatic responses that allow us to notify us if we are on vacation.
Create automatic replies
If you’ve gone on vacation, you may want to set Gmail to indicate that you won’t respond for several weeks. In this way, our Gmail email account will send an automatic response to the email address that sent us the message informing us that we will be absent for a few days. This confirms to the person trying to contact us that the message has been received correctly and that we will not be able to reply until we return from vacation.
To create and configure an automatic reply in Gmail, the first thing we have to do is enter our email account, and from the gear icon that is shown in the upper left part access the settings.
- Open Settings in Gmail
- Go to the General tab in the settings menu
- Find the section “Automatic answer”
- Make sure it’s enabled
- Choose the first day and choose the last day if there is one
- Add a subject that you want to have the answer
- Fill in the email with the information you are going to give
- Check “Save changes”
From Gmail they explain that the reply will not always be sent: If a contact sends you several messages, this reply will be sent once every four days at most. You can also choose to check a box in which the response is sent to all emails or only to your contacts.
Clear the format
If you have received an email that you want to copy but without formatting, you can also do it and it is one of the best tricks for Gmail. There are two ways to delete the text format in Gmail, the first of them is to do it before pasting it in the window where we write our message, and the second once we have already copied it.
For the first one, we can use certain keyboard shortcuts that allow us to paste plain text. For example, we can use Ctrl + Shift + V to paste a previously copied text to the Windows clipboard without the source format. In addition, we can also paste plain text if in the target application we right-click and choose the paste plain text option.
The problem usually comes when we have already copied the formatted text and we want to delete it. Then we have the option to delete it again, copy and paste it without formatting or use an extension like Gmail unformatted. It is a plugin developed for Google Chrome that we can get for free in the Chrome Web Store from this link.
With Gmail Unformatter installed in Google Chrome, when pasting a formatted text when writing an email message, we can delete the text format with a single click from the option that will appear in the upper part of the body of the message. This message will be displayed by the extension itself every time it detects that formatted text has been pasted, but with just one click we can erase the text format in our email messages in Gmail.